
Why Proper Paver Installation is the Foundation of Your Dream Outdoor Space
Paver installation is a multi-phase process that transforms your outdoor space into a durable, beautiful hardscape. A beautiful paver walkway is more than just stones in a pattern; it’s an investment in your home’s curb appeal and value. Proper paver installation creates outdoor spaces that can last 50-100 years, far outliving concrete which often needs replacement in 20-30 years.
The difference between a professional-looking project and one that settles or shifts comes down to the foundation. The seven key steps are:
- Planning and site preparation – measuring, marking utilities, and material delivery
- Excavation – removing soil to proper depth (7-11 inches depending on use)
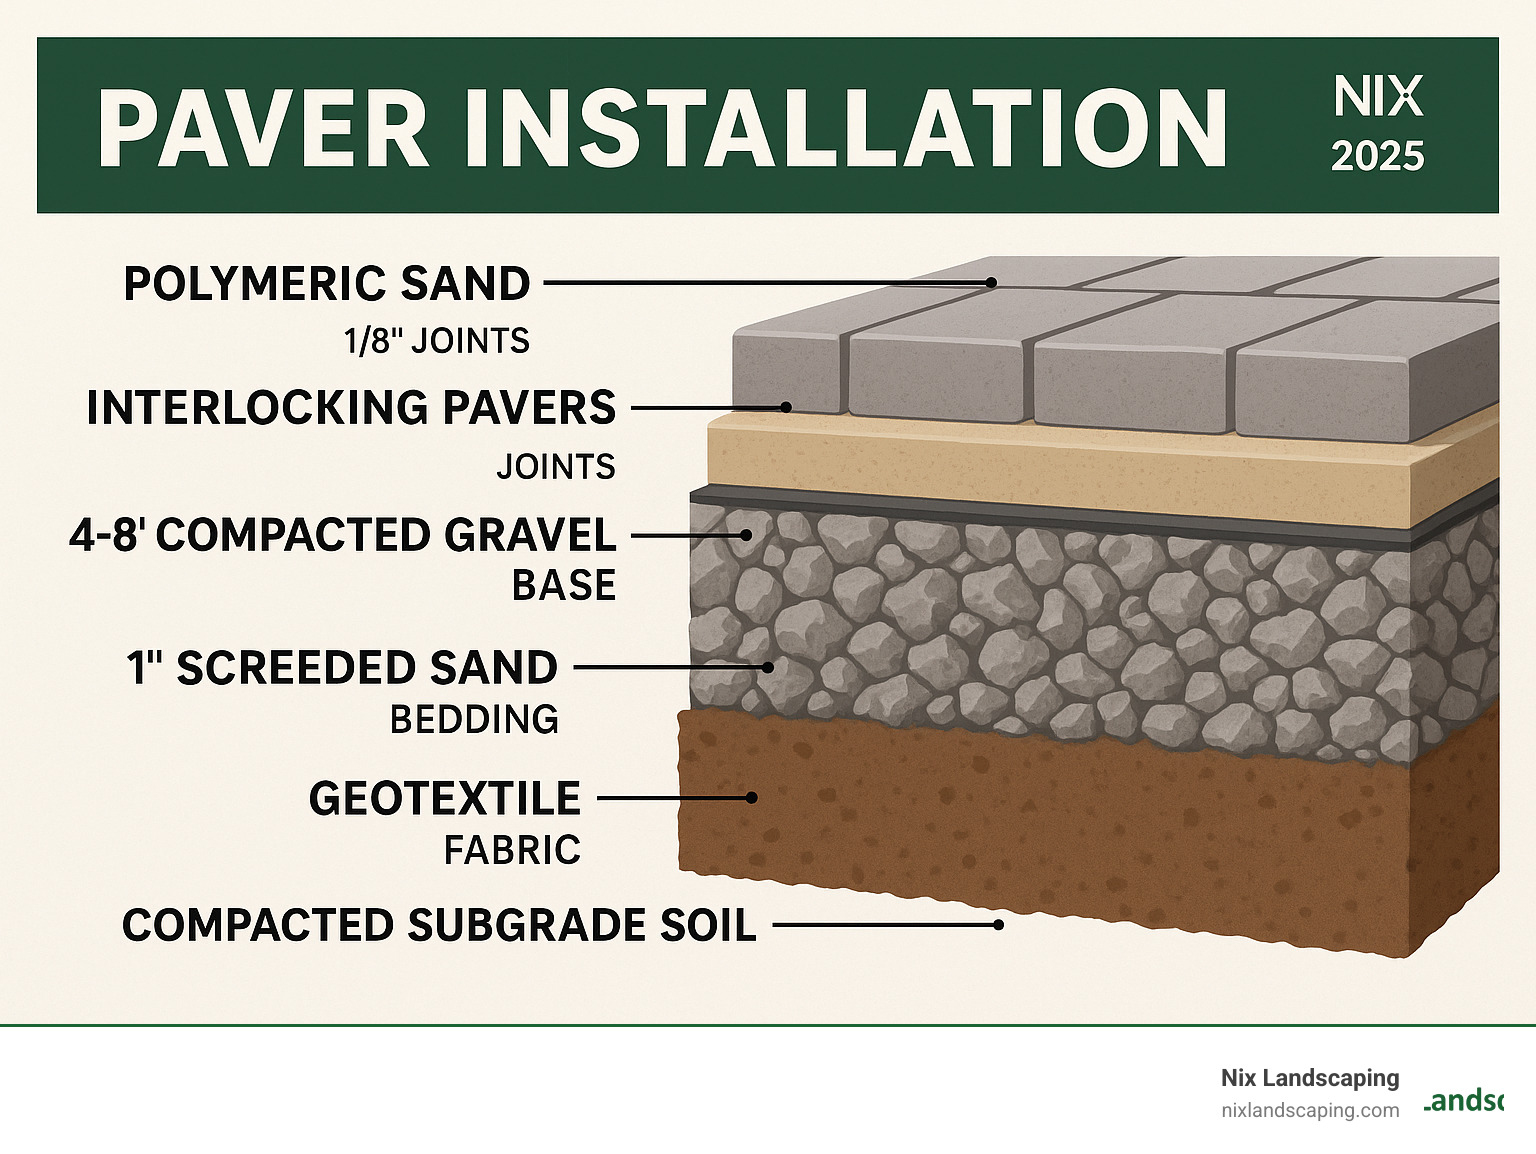
- Base preparation – installing 4-8 inches of compacted gravel base
- Sand bedding – screeding a 1-inch layer of sand for paver placement
- Paver laying – installing pavers in chosen pattern with proper spacing
- Edge restraints – securing borders to prevent paver movement
- Finishing – compacting, filling joints with polymeric sand, and sealing
A properly installed paver surface offers several key advantages:
- Durability – Individual pavers can be replaced if damaged, unlike concrete slabs
- Drainage – Allows water to filter through joints, reducing runoff
- Flexibility – Moves with freeze-thaw cycles without cracking
- Value – Typically adds more to property value than concrete alternatives
I’m Kyle Nix, owner of Nix Landscaping in Fishers, Indiana. My hands-on experience has taught me that success comes from understanding the technical requirements and common mistakes that can compromise a project’s longevity.
Phase 1: Planning and Preparation
The secret to a successful paver installation is meticulous planning. Every measurement, material order, and design decision made now prevents headaches later.
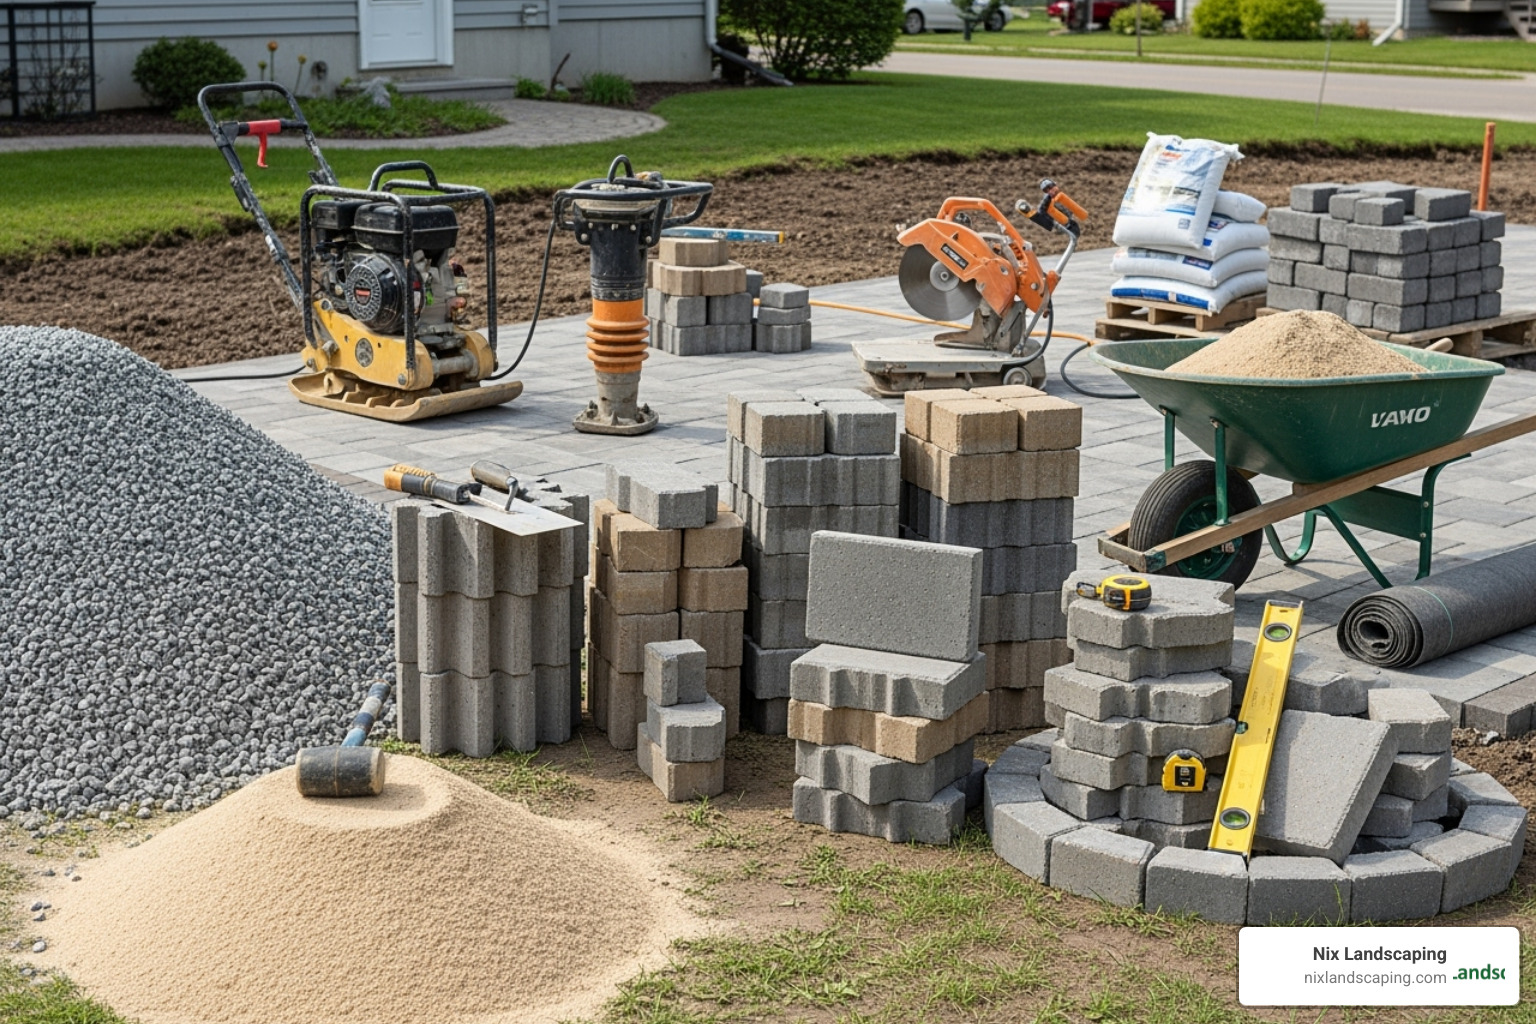
Start with a scaled drawing of your project area, marking the site layout and any obstacles. A critical first step before digging is to call 811. This free service marks underground utilities and can save you from an expensive and dangerous mistake. Also, plan your material delivery to place heavy pallets as close to the work area as possible. For expert guidance on creating your perfect outdoor space, check out our Patio Landscape Design services.
Essential Tools and Materials for Paver Installation
Having the right tools is crucial for a smooth paver installation.
Your essential tools include a shovel, wheelbarrow, tape measure, level, rubber mallet, and safety gear (gloves, eyewear, dust mask). You will also need to rent or buy a plate compactor for the base and a masonry saw with a diamond blade for cutting. Smaller tools like screed rails (metal pipes), a 2×4 board, a hand tamper, and a push broom are also necessary.
Your material list includes the pavers (order 5-10% extra for cuts), aggregate base for support, bedding sand, and edge restraints. You’ll also need geotextile fabric to place between the soil and base, and polymeric sand to lock the pavers together. For specific recommendations on quality materials, explore our EP Henry Paver Installation expertise.
Calculating Your Needs and Ensuring Proper Drainage
Correct measurements save money and prevent mid-project supply runs. First, calculate your project’s square footage (length x width). Remember to add 5-10% paver overage for cuts and waste (up to 15% for complex patterns). Then, calculate your base and sand volume based on the square footage and required depths.
Proper drainage is critical to prevent water damage. We follow the 1/4-inch drop per foot rule, meaning the paver surface should slope down and away from structures at a rate of 1/4-inch for every horizontal foot. This gentle, unnoticeable slope prevents water from pooling on the patio or running toward your home’s foundation. Establishing this slope during excavation is much easier than trying to fix it later.
For inspiration on creating the perfect outdoor space with proper drainage, visit our Custom Patios gallery.
Phase 2: The Step-by-Step Paver Installation Process
This is where your paver installation dream starts becoming reality. We’ll guide you through each crucial step to ensure your project has a solid foundation that will last for decades.
Excavation and Subgrade Compaction
Before digging, call 811 a few days in advance to have underground utilities marked. This free service prevents costly and dangerous accidents.

Once utilities are marked, begin by removing all sod and topsoil. The excavation depth depends on the project’s use:
- Patios and walkways: Dig 7-9 inches deep for a 4-6 inch base.
- Driveways: Dig 9-11 inches deep to accommodate a 6-8 inch base.
After excavating, subgrade compaction is critical. The exposed soil must be compressed with a roller or plate compactor to create a stable foundation and prevent future settling. The goal is to reach 95% Proctor density. Finally, roll out geotextile fabric over the compacted area, overlapping the edges by 12-18 inches to prevent the base material from mixing with the soil.
Building a Rock-Solid Base
A strong, compacted base is what separates a professional paver installation from one that fails over time. We use quality materials like 3/4-inch crushed stone or Class II Road Base. Spread the material in thin layers, or “lifts,” of 2-4 inches at a time. Compact each lift thoroughly with a plate compactor before adding the next. This methodical process creates an incredibly stable foundation.
| Project Type | Recommended Compacted Base Depth |
|---|---|
| Patios | 3-4 inches |
| Walkways | 3-4 inches |
| Residential Driveways | 4-8 inches |
| Heavy Vehicular Traffic | 6-8 inches (or more, up to 18″) |
Skimping on the base is like building a house on a shaky foundation. For insights on other durable hardscape options, check out our Bluestone Walkway Installation services.
Screeding Sand and Laying Pavers
Now for one of the most satisfying parts: creating the sand bed. We spread a 1-inch layer of clean, sharp concrete sand over the compacted base.
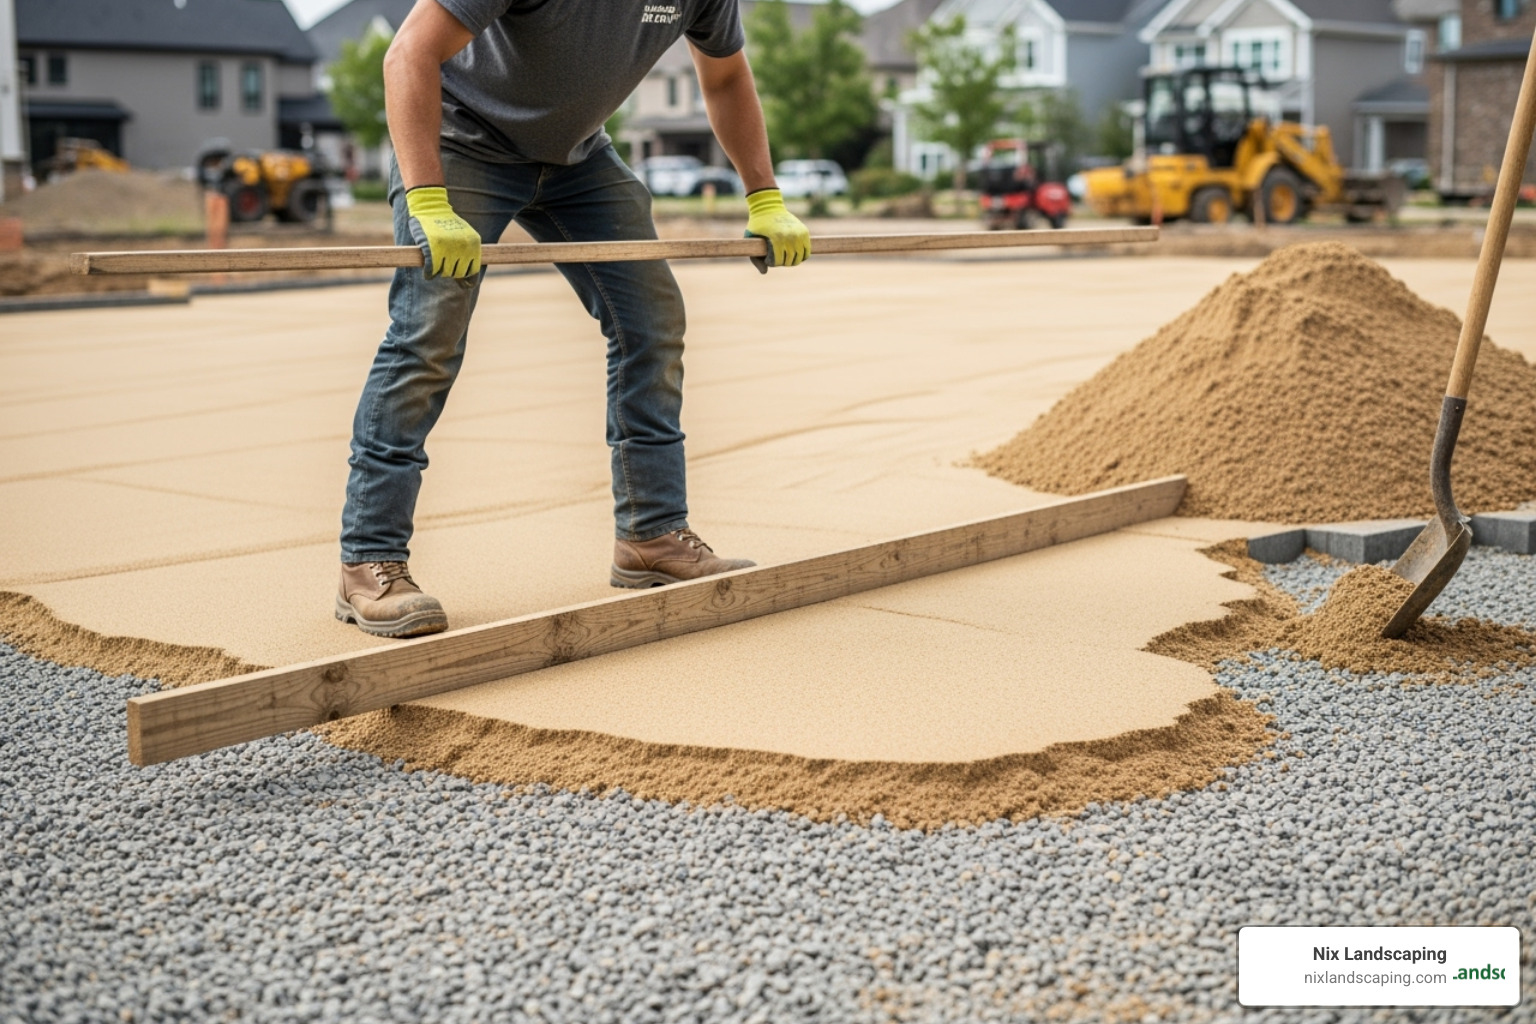
To level the sand, a technique called “screeding” is used. Place two parallel screed rails (1-inch metal pipes) on the base and drag a straight 2×4 board across them to smooth the sand to a uniform 1-inch depth. Once the sand is screeded, do not walk on it.
Laying the pavers requires precision. Start from a fixed 90-degree corner and work outward, placing each paver straight down onto the sand. Do not slide them into place. Use string lines to keep your rows straight and work from the surface of already-laid pavers to avoid disturbing the sand bed. For a complete walkthrough of our patio installation process, visit our guide on How to Install Patio Pavers.
Cutting Pavers and Installing Edge Restraints
Inevitably, you’ll need to cut pavers to fit edges and obstacles. Clean, precise cuts are essential for a professional finish.
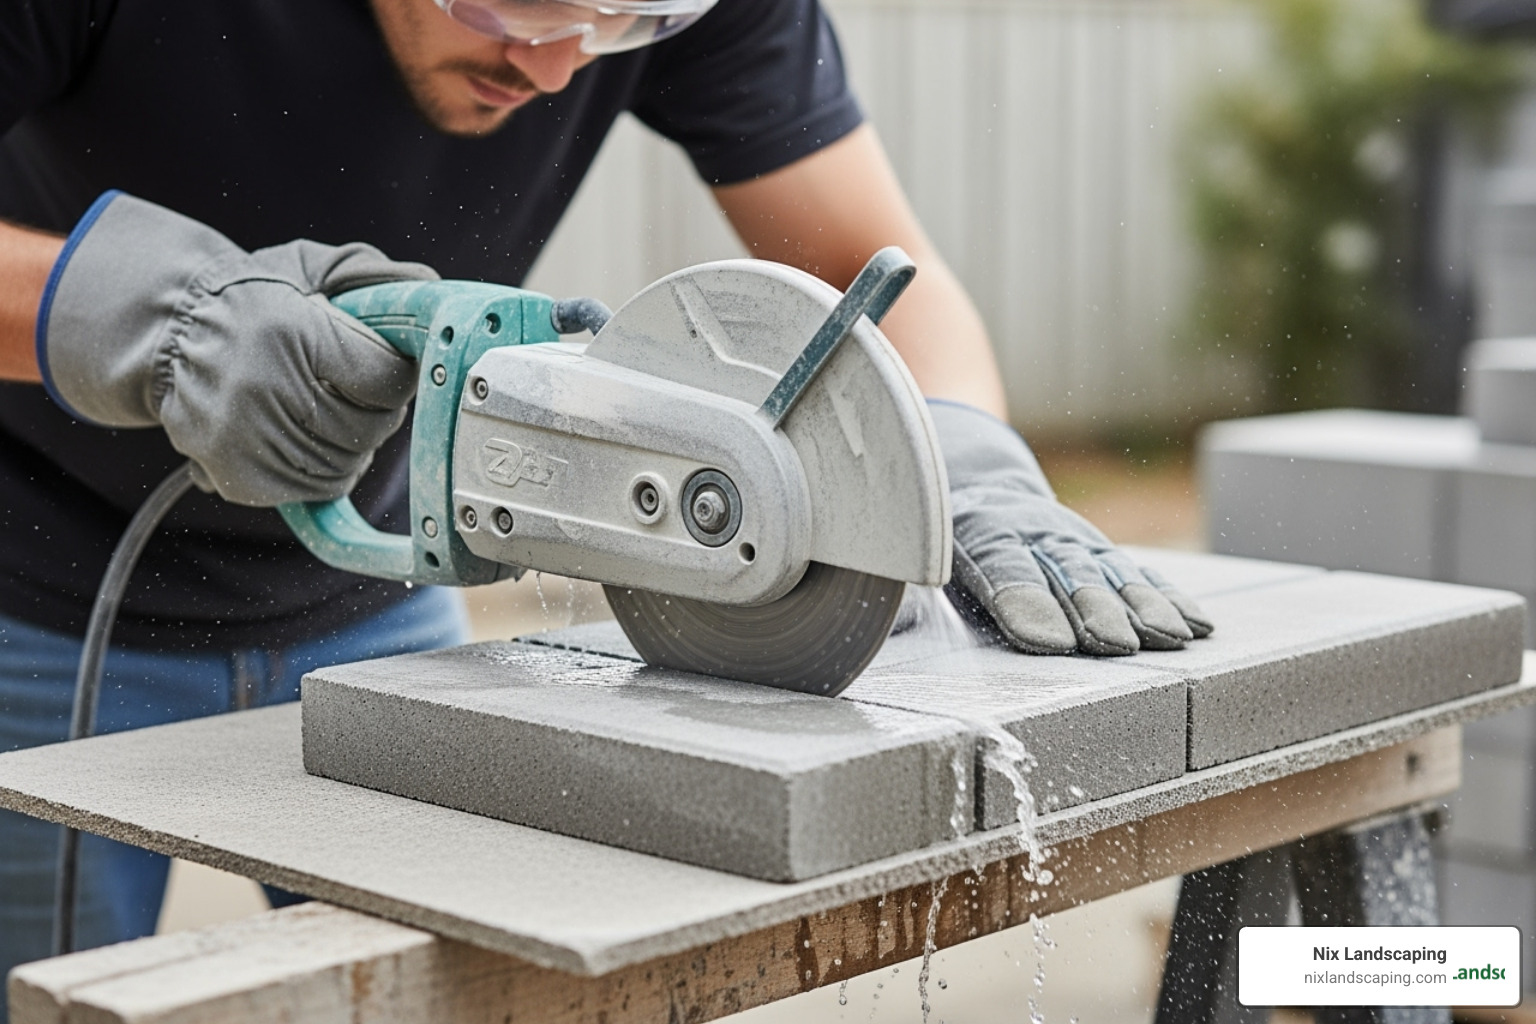
A masonry saw with a diamond blade provides the cleanest cuts. Safety gear, including heavy-duty gloves and protective eyewear, is non-negotiable. A paver splitter is an alternative for straight cuts, though the edges will be less smooth.
After all pavers are laid, install edge restraints. These are essential for preventing pavers from shifting over time. PVC or aluminum restraints are secured into the base with long spikes. For a more permanent solution, concrete edge restraints can be used. Ensure the restraints sit flush with or slightly below the paver surface to avoid a tripping hazard. This step keeps your paver installation looking crisp for years. Learn more about our approach to durable walkway construction at Walkway Paver Installation.
Phase 3: Finishing Touches and Project Variations
We’re in the home stretch. This is where your paver installation transforms from a construction site into a beautiful outdoor space. These finishing details are critical for long-term performance.
Compaction, Jointing, and Sealing
This final phase locks your pavers into place, ensuring decades of durability.

First, run a plate compactor over the entire paver surface in an initial compaction pass. This settles the pavers evenly into the sand bed.
Next, spread polymeric sand generously across the surface and use a push broom to sweep it into every joint until full. Then, perform a final compaction pass with the plate compactor to vibrate the sand deep into the joints, locking the pavers together. Repeat the sweep-and-compact process if needed to ensure joints are packed.
Finally, activate the sand with a gentle misting of water. This causes the polymers to harden, creating a durable, flexible joint that resists weeds and erosion. Sealing is an optional but highly recommended final step. A quality sealer protects against stains, improves color, and adds another layer of weed protection. For expert finishing, explore our Patio Company Near Me services.
Patios vs. Walkways vs. Driveways: Key Differences
While the core paver installation process is similar, the design must match the intended use.
- Patios and walkways handle foot traffic and require a 3-4 inch compacted base with standard 2 3/8 inch thick pavers.
- Residential driveways must support vehicles, so they need a stronger 4-8 inch base and thicker 3 1/8 inch pavers to prevent settling and rutting.
- Heavy-duty applications (e.g., for RVs) demand the most robust foundation, with a base of 6-8 inches or more and often require engineering consultation.
Matching the construction to the use ensures the project is built right the first time. Our Patio Installation Services and Walkway Paver Contractors teams always follow these best practices.
The Rise of Permeable Pavers
Permeable pavers are an environmentally friendly solution for managing stormwater. Instead of creating runoff, they allow rainwater to soak into the ground naturally.
These systems use pavers with wider joints and a specialized base made of washed, crushed stone of various sizes. This base acts as a reservoir, storing water as it slowly percolates into the subsoil. Permeable systems require more maintenance, such as annual sweeping or vacuuming, to keep the joints from clogging with debris. However, for homeowners concerned with drainage and environmental impact, they offer an excellent solution that works with nature. For larger projects, check out our Commercial Hardscaping Service expertise.
Phase 4: Budgeting Your Project and When to Call a Pro
Even the most beautiful paver installation needs to fit your budget. Understanding the costs and weighing the pros and cons of DIY versus professional installation will help you make an informed decision.
Estimating Your Paver Installation Cost
Paver installation costs vary widely based on materials, labor, and project complexity. Nationally, expect to pay between $9 to $20 per square foot for a complete installation, with most projects averaging $14.50 per square foot. In the Fishers, Indiana area, costs typically run from $13-$18 per square foot.
Key factors influencing your final cost include:
- Material Choices: Basic concrete pavers are less expensive than premium natural stone.
- Labor Costs: Often accounts for over half the budget, typically $55-$75 per hour.
- Site Conditions: Difficult soil or poor access can increase costs by 15-30% due to extra labor and equipment needs.
- Design Complexity: Simple rectangular patterns are more affordable than intricate, curved designs.
- Hidden Costs: Don’t forget permits, debris removal, and potential sprinkler or electrical line rerouting.
For a ballpark estimate, you can use online tools like the Homewyse calculator. For a detailed local breakdown, see our Cost of Patio Pavers Installed Per Square Foot page.
DIY vs. Professional Paver Installation: Making the Right Choice
Deciding whether to DIY or hire a pro is a major consideration. While paver installation may look simple, it involves significant physical labor and technical skill.
The DIY approach can save 30-40% on labor costs. However, be prepared for the challenges. A 350-square-foot patio requires 40-60 hours of hard physical labor, and tool rentals can cost $200-$400. Inexperience can lead to costly mistakes in base preparation or drainage that are expensive to fix later. For driveways, professional installation is strongly recommended due to the structural demands.
Professional installation offers expertise, efficiency, and peace of mind. A professional crew understands local soil conditions, has commercial-grade equipment, and can complete the job correctly and quickly. Most importantly, professional work comes with workmanship warranties, protecting your investment. The decision depends on your budget, time, physical ability, and risk tolerance. For complex projects or guaranteed results, professional paver installation delivers better long-term value.
Ready to explore professional options? Visit our Paver Patio Landscape Company page.
Frequently Asked Questions about Paver Installation
Over the years, I’ve noticed the same questions about paver installation come up repeatedly. Here are the answers to the most common concerns.
How long will a paver installation last?
With proper paver installation and basic maintenance, your patio or walkway can last 50 to 100 years. This impressive lifespan is a key advantage over poured concrete, which typically fails in 20-30 years. The longevity varies by material: concrete pavers last 25-50 years, clay brick can exceed 50 years, and natural stone can last over a century. The system’s flexibility allows it to move with freeze-thaw cycles, and individual pavers can be easily replaced if damaged.
Can I install pavers over an existing concrete slab?
I strongly recommend against this. While it seems like a shortcut, installing pavers over concrete creates significant problems:
- Poor Drainage: Water gets trapped between the pavers and the non-draining concrete slab, leading to moss, stains, and freeze-thaw damage.
- Structural Instability: If the underlying concrete cracks or settles, the pavers on top will become uneven and fail.
- No Engineered Foundation: You lose the benefit of the compacted, flexible base that gives a paver system its strength and longevity.
For a durable, long-lasting result, the existing concrete should always be removed to build a proper base from the ground up.
How do I prevent weeds from growing between my pavers?
While no method is 100% foolproof, a proper paver installation makes weed prevention highly effective. The fight against weeds starts with a well-compacted base and the use of geotextile fabric to block growth from below.
Your strongest defense is polymeric sand. When activated with water, it hardens into a firm, mortar-like joint that makes it extremely difficult for weed seeds to germinate. Regular maintenance, like sweeping and occasional spot treatment, handles any airborne seeds. Finally, sealing your pavers every 2-3 years adds another layer of protection and makes the surface less hospitable to weeds.
Conclusion
Stepping back to admire a finished paver installation is a deeply satisfying moment. You’ve created more than a hardscape; you’ve built a foundation for memories and boosted your home’s value. The process is a blend of art and science, where meticulous base preparation leads to decades of durability and precise laying techniques ensure lasting beauty.
Whether you’re dreaming of a cozy patio or an neat walkway, the principles of a solid foundation, proper drainage, and quality materials are key to creating an outdoor space that stands the test of time. The DIY versus professional decision depends on your time, budget, and comfort with the project’s complexity. While DIY offers pride of ownership, professional installation provides expertise, efficiency, and the peace of mind that comes with a warranty.
The durability and longevity of properly installed pavers—often lasting 50 to 100 years—make them a superior investment compared to concrete, which typically needs replacement in 20-30 years. Here in Fishers, Indiana, we at Nix Landscaping have seen how the right hardscape can transform a property. Our team understands local soil and weather conditions, handling everything from design to cleanup.
Ready to transform your outdoor space? Explore our comprehensive Patios and Paving services, and let’s turn your vision into reality.

